
How to Clone Your Voice in Arcframe and Narrate Videos With It
Record thirty seconds once, and narrate every video in your own voice from then on. A step-by-step guide to saving a voice, preparing it, and using it — including how many voices each plan allows and what it costs.
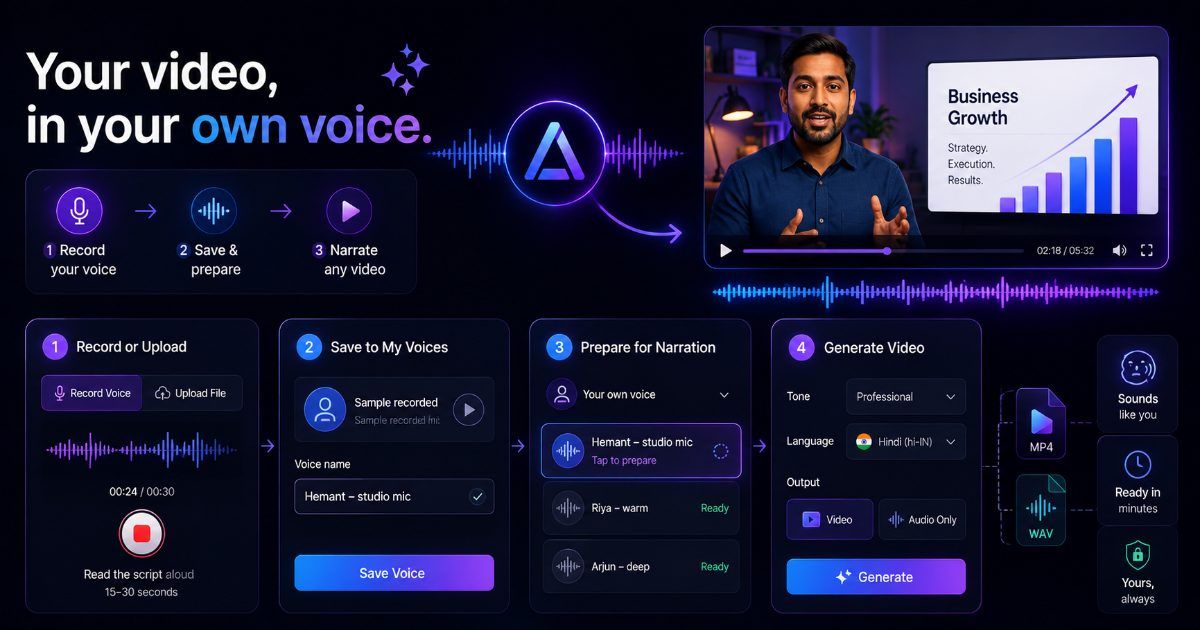
Your video, in your own voice
A synthetic voice is fine for a product demo. It is less fine when the video is from you — a founder update, a coach breaking down a performance, a teacher explaining a topic their students already know the sound of. For those, the voice is part of the message.
Arcframe lets you record a short sample once, and then narrate videos in that voice for as long as you keep it. This guide walks through the whole flow, and it takes about two minutes.
First, two different things called "cloning"
Arcframe has two features that both involve a reference recording. Knowing which one you want saves confusion:
| Voice-clone models | Your own voice for narration | |
|---|---|---|
| Where | Audio tab, Voice clone mode | PPT/PDF/Image to Video tab |
| What it makes | A one-off audio clip from a script you type | Narration for a whole video or deck |
| Models | Lux TTS, MiniMax Voice Clone | Prepared once, then reused |
| Cost | 5 credits per clip | Free to prepare |
| Plans | Pro and Studio | Every plan, including Free |
This guide covers the second one. Both start the same way: by saving a voice.
Step 1 — Record or upload a sample
Open the dashboard, select the Audio tab, then Voice clone at the bottom. You have two ways to provide a sample:
- Record Voice — records in your browser. Pick your microphone, read the script on screen aloud, and stop when you are done. The recorder runs up to 30 seconds.
- Upload File — accepts
.mp3,.wav,.oggand.flac. Use this if you already have clean audio, or if you want a sample longer than 30 seconds.
Aim for 15 to 30 seconds of clear, natural speech. Anything under 8 seconds is refused — there is not enough of your voice in it to work from.
One thing that surprises people: while the Record Voice tab is open, the model picker is deliberately greyed out. Recording a sample does not run any model and does not spend any credits. The picker matters later, when you generate a clip from the voice.
Step 2 — Save it to My Voices
After recording, play it back. If it sounds like you, click Use this recording; if not, re-record — it costs nothing to try again.
A box then appears reading "Name this voice to save it…". Give it a name you will recognise later — "Hemant — studio mic" is more useful than "voice 1" once you have several — and click Save. It now appears under My Voices, and it will still be there tomorrow.
Step 3 — Prepare it for narration
Switch to the PPT/PDF/Image to Video tab and upload whatever you want narrated. Under Narration voice engine, choose Your own voice.
Your saved voices appear here. A new one reads "Tap to prepare". Tap it once — that is the one-time step that turns your recording into a usable narration voice, and it takes a few seconds. The label changes to "Ready" and the voice is selected.
That preparation happens once per voice, not once per video. Every video after this narrates in your voice immediately.
If you have not saved a voice yet, this section shows a "No voices yet" button that takes you straight to the Audio tab — and your uploaded file is kept, so you will not have to upload it again when you come back.
Step 4 — Generate
Choose your tone, language, and whether you want a video or an audio-only track, then generate. You will be emailed when it is ready.
Preparing a voice is free. When you narrate with it, the cloned voice adds 4 credits per slide on top of the normal job price — so a single image narrated in your own voice is 7 credits as a video, or 6 as an audio-only track. The total is always shown before you generate.
How many voices you can keep
| Plan | Prepared voices |
|---|---|
| Free | 1 |
| Starter | 2 |
| Pro | 3 |
| Studio | 10 |
Every plan gets at least one, on purpose — narrating in your own voice is worth trying before you decide whether to pay for anything. Deleting a voice from My Voices frees its slot, so you can swap voices rather than being stuck with an early recording. You can save as many unprepared recordings as you like; only prepared ones count against the limit.
Getting a sample that actually sounds like you
- Read the script on screen. It is written to cover a wide range of sounds in a short space, which gives the clone more to work with than the same sentence repeated.
- Speak the way you would narrate. The clone reproduces your delivery, not just your timbre. Record in a flat, hurried tone and every video will sound flat and hurried.
- Quiet room, no background music. A fan, a TV, or traffic all end up in the voice.
- Do not over-project. Normal speaking volume at a normal distance beats a loud, close-miked take.
- Longer is better, to a point. 25 seconds of varied speech beats 10 seconds of one sentence.
Troubleshooting
- "That recording is too short to clone." The sample was under 8 seconds. Re-record and aim for 15 to 30.
- "You've prepared X of Y voices." You have used your plan's allowance. Delete a voice you no longer use, or upgrade.
- "Voice cloning is at capacity right now." This one is not about your allowance — deleting your own voice will not help. Try again a little later.
- You cannot find ElevenLabs in the Audio tab's model list. It is not there by design. The Audio tab's clone models are Lux TTS and MiniMax; your own narration voice is prepared from a saved recording and used on the PPT/PDF/Image to Video tab.
- The microphone dropdown is empty or blocked. Your browser is refusing microphone access. Allow it in the site permissions and reload, or use Upload File instead.
Try it with what you already have
You need one image or one slide and thirty seconds of speech. Free accounts include enough credits to hear the result before committing to anything — open the Audio tab and record.