How to Use Arcframe's Enhance Prompt: A Complete Guide for Every Output Type
A detailed walkthrough of the Enhance Prompt button — what it does for video, image, audio, and 3D generations, plus real before-and-after examples.
The Problem With Short Prompts
AI generation models — whether for video, images, audio, or 3D — are trained on richly described datasets. A short prompt like "a product ad for a coffee brand" gives the model little to work with. The output is usually generic. You iterate. You burn credits.
Arcframe's Enhance Prompt feature bridges the gap between what you can quickly type and what the model needs to produce a great result — automatically, in one click.
Finding the Button
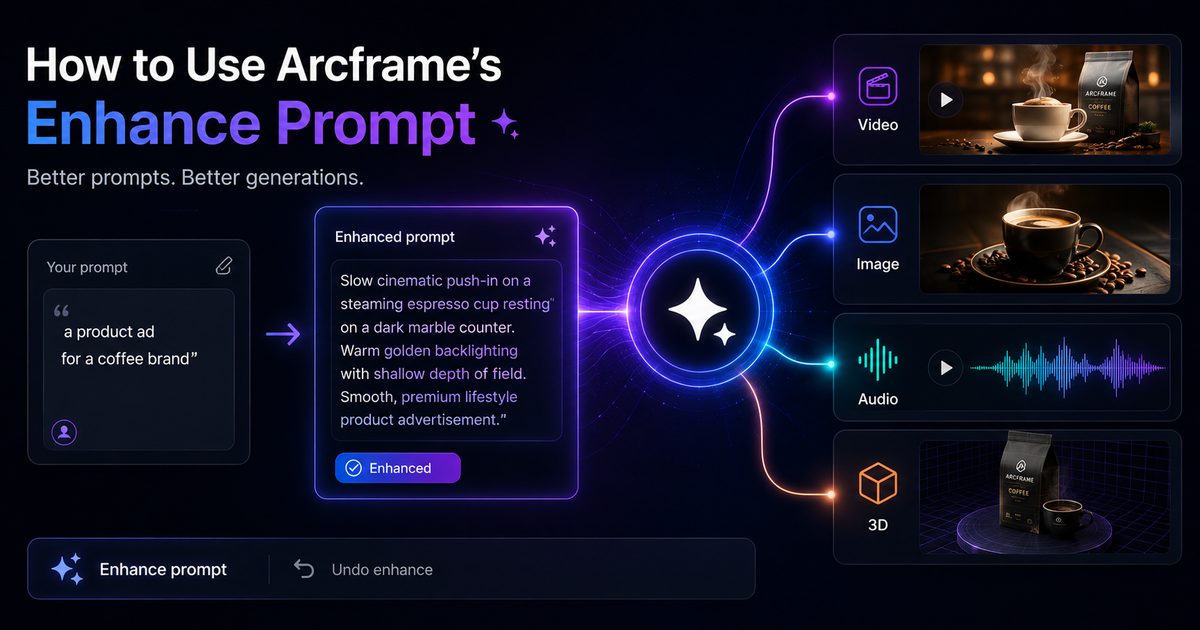
The Enhance Prompt button (labelled ✦ Enhance prompt) sits in the bottom toolbar of the dashboard prompt card, on the far left, next to a sparkle icon. It is visible for all output types except Remove Background (which has no prompt). Once you click it, the textarea shows a diagonal shimmer while the AI processes your brief — usually under 2 seconds.
What Happens for Each Output Type
Video
The AI expands your brief with:
- Camera movement language (slow push-in, aerial pan, handheld tracking shot)
- Scene pacing and cut structure
- Lighting and colour grade descriptors (golden hour, neon-lit, high-key studio)
- Subject-specific motion detail
Before: "a product ad for a coffee brand"
After: "Slow cinematic push-in on a steaming espresso cup resting on a dark marble counter. Warm amber backlighting with shallow depth of field. Cut to overhead pour shot: rich crema swirling as espresso hits a white ceramic cup. Smooth, aspirational mood. Premium lifestyle product advertisement."
Image
The AI adds composition, style, and rendering vocabulary:
- Framing and composition (rule of thirds, symmetrical, macro)
- Art style and medium (photorealistic, hyperrealistic CGI, oil painting)
- Lighting quality (soft diffused, rim-lit, dramatic chiaroscuro)
- Post-processing and detail level (8K, sharp focus, HDR)
Audio — Music
The AI translates your mood into production language:
- Tempo in BPM
- Instrumentation and arrangement layers
- Genre reference and production style
- Dynamic arc (builds, drops, intros, outros)
Audio — Speech
For speech modes the AI adds pacing and delivery direction using inline cues like [pause], [whispers], [excited] — the same notation the Translate Prompt feature preserves when localising to Indian languages.
3D
The AI adds:
- Material and surface descriptors (brushed metal, matte ceramic, rough stone)
- Topology level (low-poly, production mesh, hero asset quality)
- Environment and lighting context for reference
The Undo Button
After every enhancement, an ↩ Undo enhance link appears in the word-count row below the textarea. Click it to restore your original text exactly as you typed it. The undo state clears automatically when you start typing again — so there is no manual cleanup.
Credit Usage and Best Practices
Each use of Enhance Prompt costs 1 credit, deducted immediately on click. To get the most value:
- Enhance once per session, not per retry. If the generation misses, adjust the enhanced prompt manually rather than enhancing again from scratch.
- Set your mode and model before enhancing. The AI tailors the rewrite to your current selection — switching modes after enhancement may make the prompt less optimal.
- Use it for rough briefs, not detailed ones. If you already have a 150-word script with precise camera directions, skip it. Enhancement adds the most value when you have 10–20 words.
- Review before generating. The AI is good, but you know your brief. A 10-second review of the enhanced prompt before clicking Generate catches any drift from your original intent.
Step-by-Step Summary
- Go to the Arcframe dashboard → select your output type.
- Choose your generation mode (e.g. Cinematic for video, Text-to-Music for audio).
- Type a rough brief — even 10 words is enough.
- Click ✦ Enhance prompt. Wait ~2 seconds for the shimmer to finish.
- Read the rewritten prompt. Use ↩ Undo enhance if you prefer your original.
- Click Generate.
1 credit invested upfront, fewer retries, better results. That is the Enhance Prompt promise.